Welcome to Podia!
Learning a new platform can feel overwhelming. This quick guide will help you get up and running fast.
Now your website, digital products, email, customers, and blog are automatically connected in one place. Let's set up your first product, explore the Podia website builder, create a course, and turn on email.
Feel free to skip around using the purple navigation bar below. You don't have to follow this guide in any particular order, so start with whatever feels most interesting or relevant to your business. 💜
Step 1: Products | Step 2: Website & Blog | Step 3: Courses | Step 4: Email | Step 5: Bonus Podia Tricks!
<p id="digital-products"></p>
Step 1 📚
Adding your first product to Podia
💜 More resources for building digital products
PDF Checklist: How to build a digital product in Podia
Help center: Digital product help docs
Step by step: How to create a digital download
First sale to full scale: Podia's video guide to making and selling digital products
First, let's add a product to your Podia account.
Click the "Products" tab in the top menu of your Podia site.
Select the type of product you'd like to add.
Name your product and click "Create"
You can set up one digital download and one coaching product on the Free plan, and unlimited products of all types on the Mover and Shaker plans.
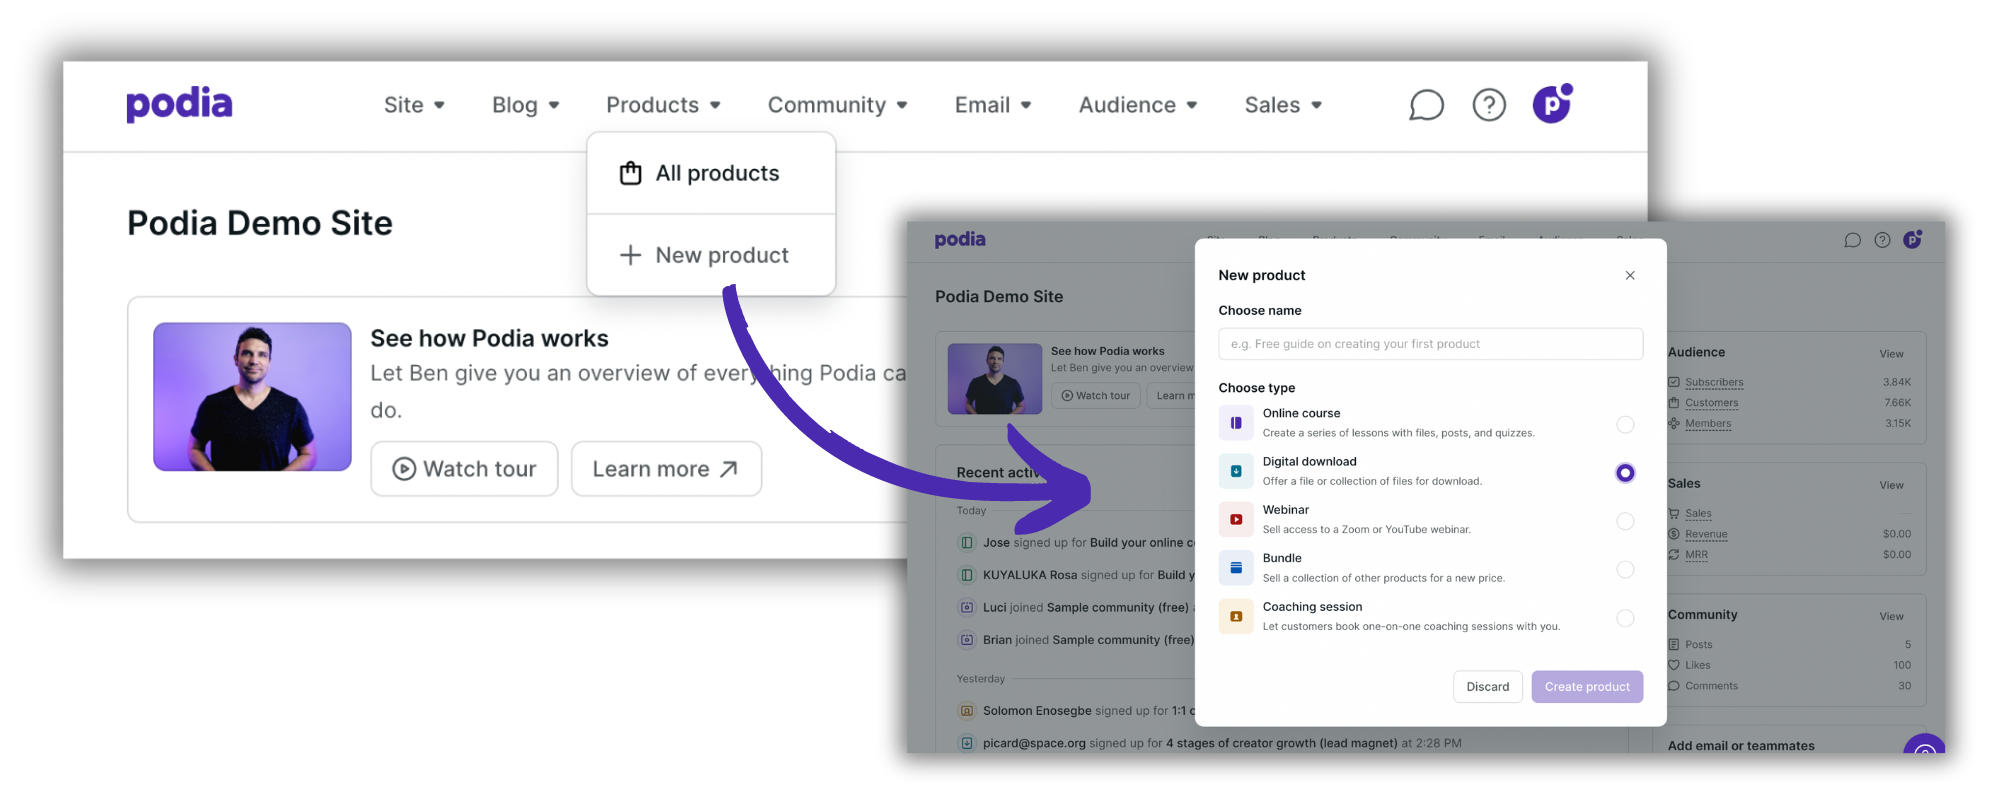
Click "Create Product," then click through the tutorial below to see how product setup works. This one shows you how to set up a digital download, but the same steps apply for other product types like webinars, bundles, and coaching.
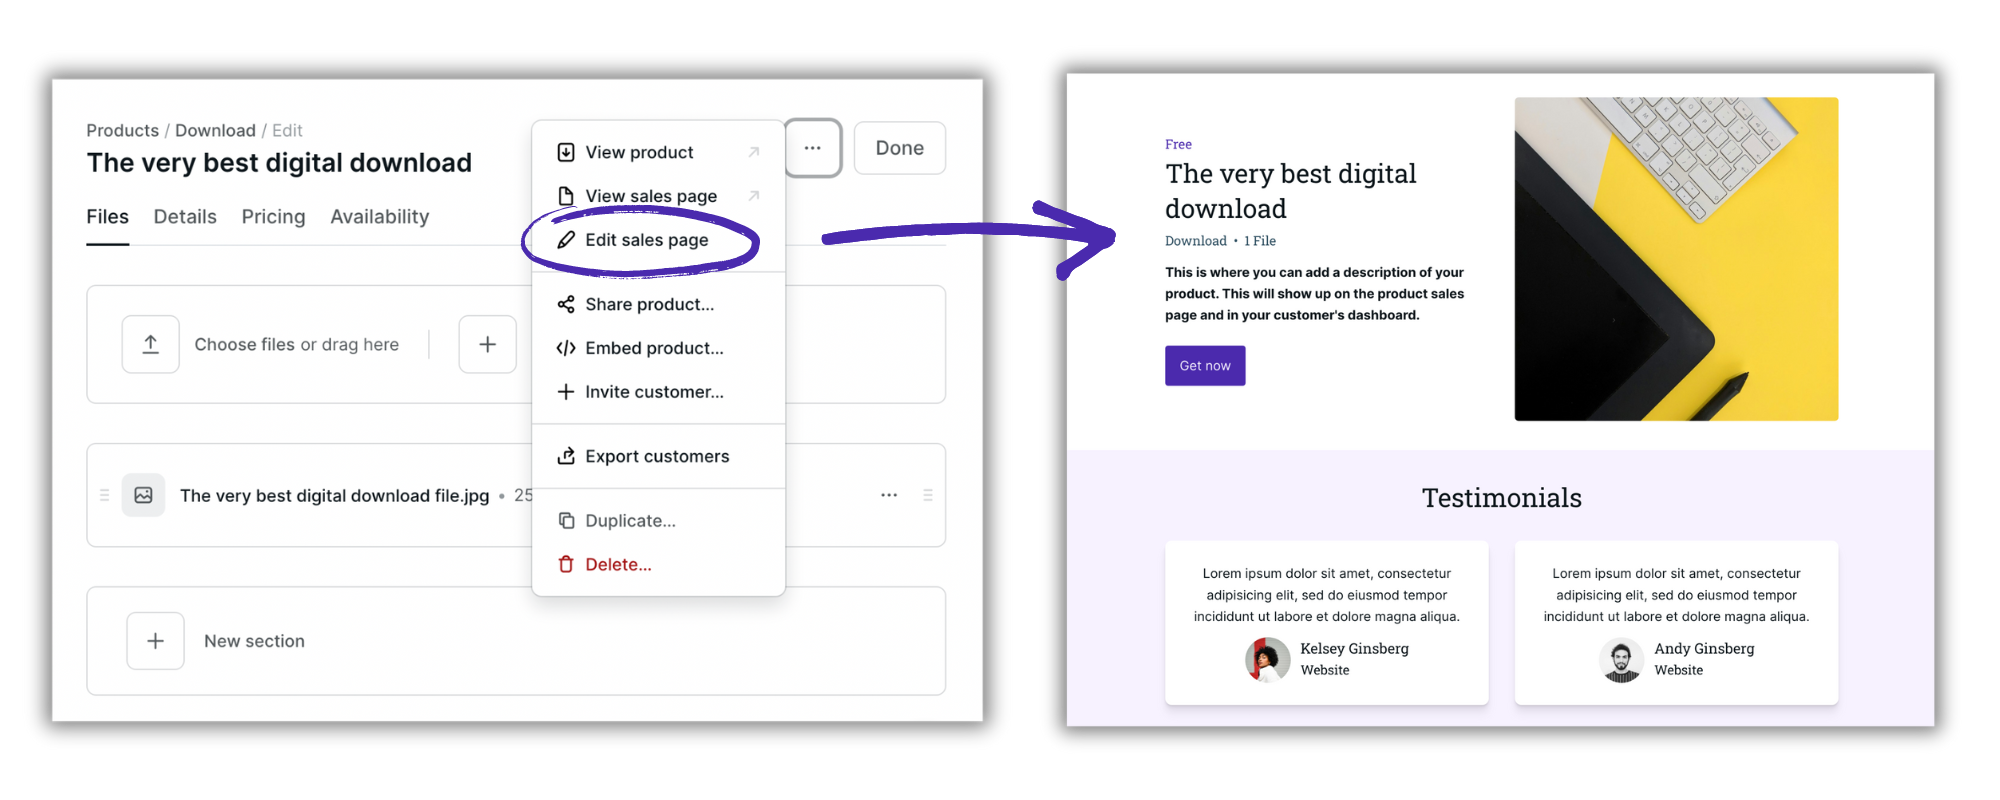
Up next, you can customize your sales page for your product so people can purchase it.
Click on the three dots in the top corner to open up the sales page editor. Then keep reading, because we'll cover how to use the Podia website editor in the next section.
Step 1: Products | Step 2: Website & Blog | Step 3: Courses | Step 4: Email | Step 5: Bonus Podia Tricks!
<p id="website-blog"></p>
Step 2 💻
Setting up a simple website and blog
💜 More website and blog resources
PDF Checklist: Setting up your Podia website
PDF Checklist: Setting up your Podia blog
Help center: Podia website builder tutorials
Video series: Your complete Podia website guide
Written guide: How to build a website you love in Podia
Podia uses a point and click website editor. All the sections have been professionally designed so they'll all look great, and you can make customizations to get your site looking exactly the way you like.
Edit your website
In your Podia dashboard, click on "Site" and "Edit site" to open the Podia website builder. Click "View site" to see what your live site looks like.
Edit your blog
Click on "Blog" to open your Podia blog options. You add a new post, view all blog posts, or view your live blog.
Change your colors
Click "Site" - "Edit site" to open the Podia website builder, then click on the Design tab in the top menu. Select "Colors" to change your website's color palette. There are premade palettes or you can add your own.
Change your fonts
Again, click "Site" - "Edit site" to open the Podia website builder, then click on the Design tab in the top menu. Click "Fonts" to change your website's font style and size. There are preset font pairings or you can customize your own.
Video tutorial 🎥
Customize Taylor Swift's Podia blog in 6 minutes
This video shows you how to use the Podia website builder. Add sections to your website and blog by clicking the plus sign anywhere on the page. Then choose the section you'd like to add from the left-hand menu. You can make changes and customizations with the Content and Design tabs.
Content tab: This is where you can adjust the text, images, embeds, and grid items in each section.
Design tab: This is where you can change the layout, image shape, color, background image, and style of each section.
Step 1: Products | Step 2: Website & Blog | Step 3: Courses | Step 4: Email | Step 5: Bonus Podia Tricks!
<p id="online-course"></p>
Step 3 🎬
Building your course
💜 More course resources
PDF Checklist: Create your online course in Podia
Help center: Online course tutorials
Written guide: How to create, sell, and profit from your online course
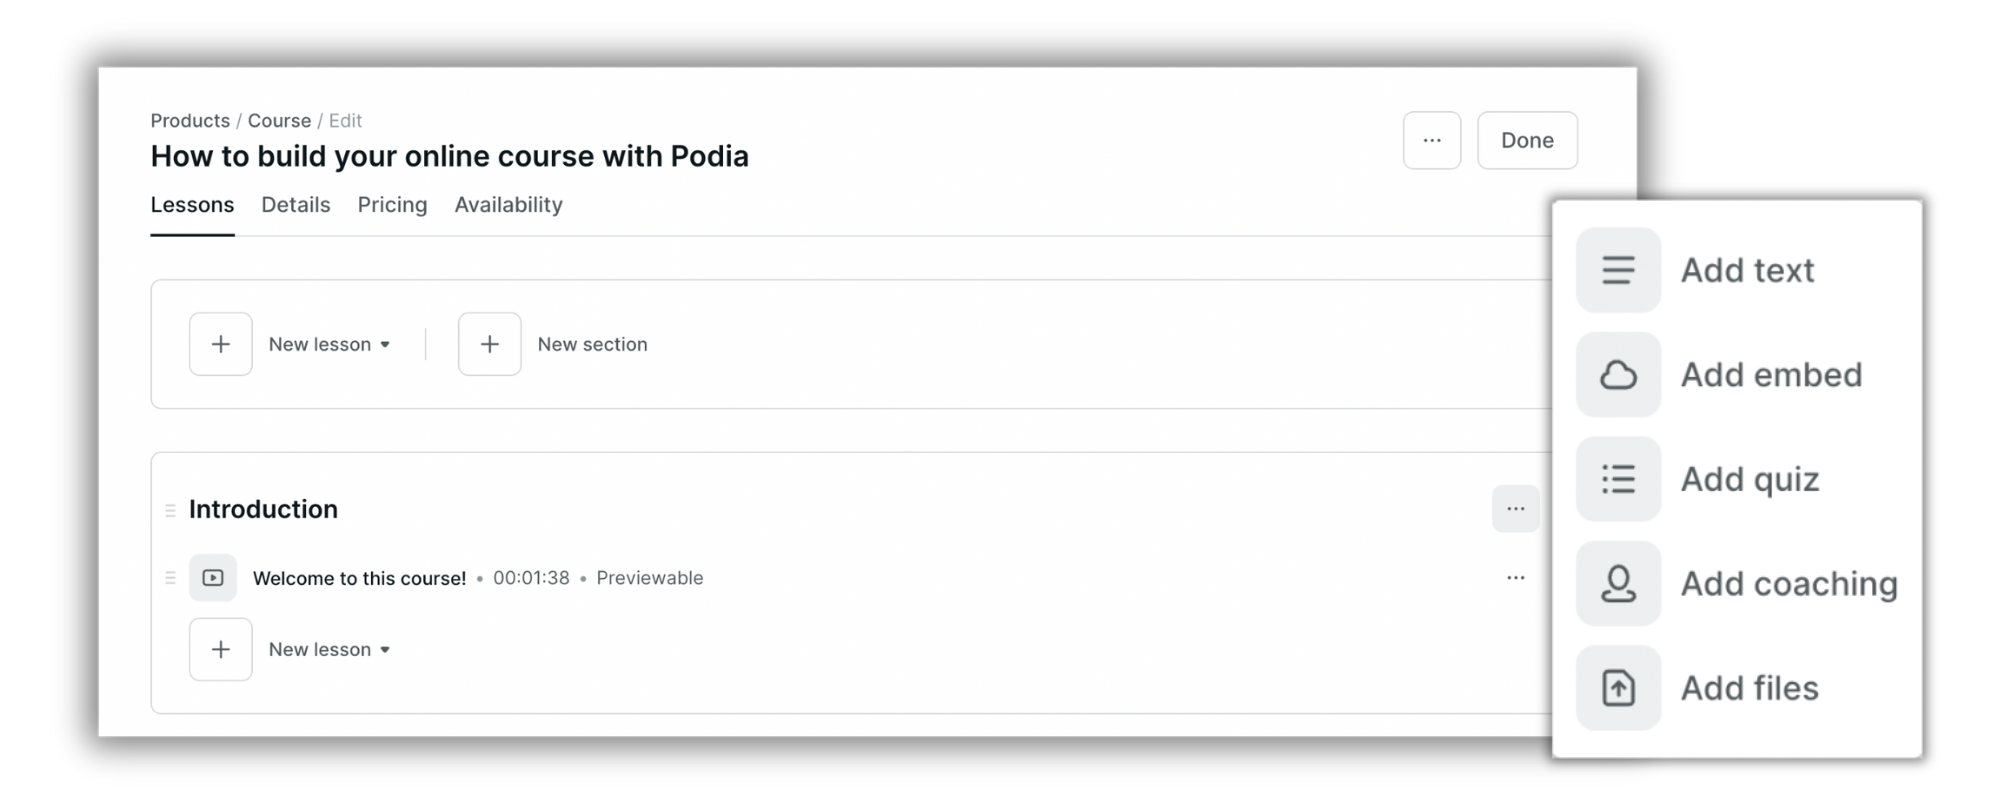
To set up your course in Podia, click "Products" - "New product" - "Online course." Name your course, and click the "Create" button. You'll see the following options for building and customizing your online course.
Lessons: Add new lessons and sections to your course. Lessons can include media like text, images, videos, quizzes, files, embeds, and even coaching sessions. You can add as many lessons and sections as you like.
Details: Change your course's name, image, and description.
Pricing: Set the price for your course as free, waitlist, or paid. You can also add up to three upsell products that will be displayed after checkout.
Availability: Decide whether your course is open or closed for enrollment, and customize the number of seats available, start date, and access duration.
Podia tip ✨
The course below has video lessons and tutorials that show you how to build your podia course. It's a course within a course! If you'd like to see what the checkout process looks like for your customers, click the checkout button below. Otherwise, you can skip checkout and jump right into the content to start building your course.
How to build your online course with Podia
- Course
- 21 Lessons
Step 1: Products | Step 2: Website & Blog | Step 3: Courses | Step 4: Email | Step 5: Bonus Podia Tricks!
<p id="email-list"></p>
Step 4 ✉️
Set up your email list
💜 More email resources
PDF Checklist: Set up your Podia Email marketing & newsletter
Help center: Podia Email tutorials
Tutorial: Getting started with Podia Email
Video: Podia Email demonstration
Free course: Grow your audience & email list with "Get Noticed"
It only takes a minute to get your email list set up with Podia. To start, click on the "Email" tab in the upper menu of your Podia site. The first time you click on "Broadcast" or "Campaign", you'll see the setup screen below. You'll need to add your mailing address to comply with email-sending laws, and you can choose to add a double opt-in (recommended) and customize your opt-in text.
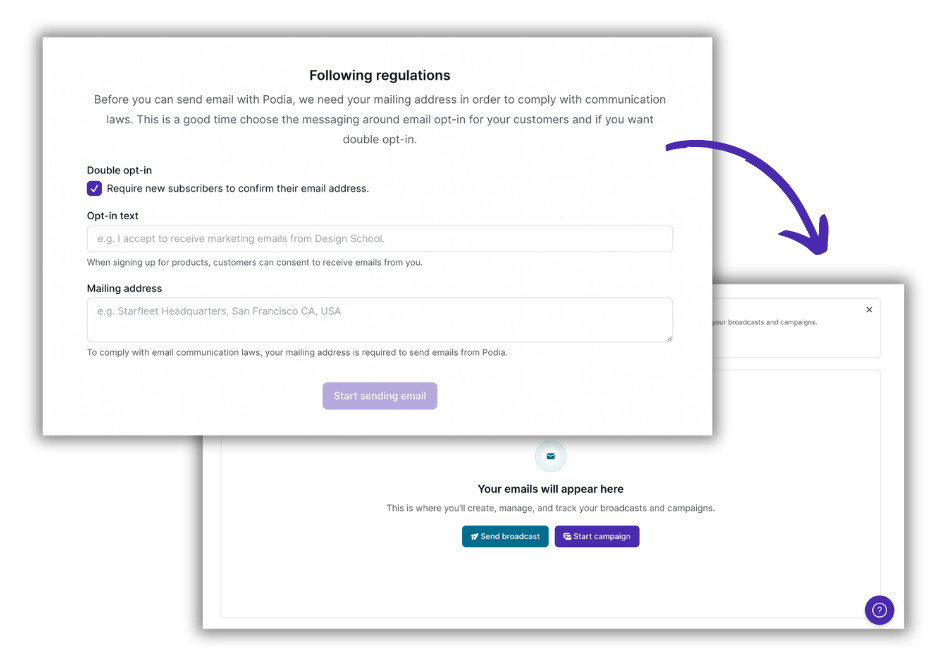
Then you'll see an email dashboard with all your previous messages and email stats. Click "Send broadcast" to send a one-off email to your list, like a newsletter or announcement. Click "Start campaign" to build an automated series of emails that go out when people do things with your business, like buy a product, join a waitlist, or subscribe to your newsletter.
Now let's send your first email
Step 1: Products | Step 2: Website & Blog | Step 3: Courses | Step 4: Email | Step 5: Bonus Podia Tricks!
Step 5 ✨
Bonus: More cool things you can do in Podia
<p id="podia-tricks"></p>
This guide is just the beginning of all the things you can do with Podia! Check out these resources to continue building your business. We can't wait to see what you make next.
Publish a blog post
Make a link in bio page
Set up a welcome email
Sell coaching sessions
Offer a free lead magnet
Add an upsell at checkout
Help!
Still have questions about getting started with Podia? These resources can help.
For step by step instructions for using Podia...
Take a look through our large library of blog posts, guides, and YouTube videos
For ideas about how to grow your business...
To talk to a member of our friendly support team...
Send an email to hello@podia.com to get in touch!